Woodworking and other projects involving the use of a saw come in many forms, ranging from the more primitive variety to finer, more intricate cutting. I think it’s safe to say that scroll saws fall more on the intricate side.
When it comes to types of saws, there always seems to be a debate on what is considered essential.
For anyone wanting to undertake finer woodworking projects—whether for the sake of art or a particular project’s needs—a scroll saw is a must-have in every way.
Ever wondered how someone made a wooden puzzle or created dovetail joints on a workpiece for a cabinet they’re building? They likely used a scroll saw.
A scroll saw is certainly a favorite among expert woodworkers, but that doesn’t mean you have to be more advanced to appreciate one. In fact, many younger kids use a scroll saw as their first experience with a power saw.
So, if you’re wondering what a scroll saw does, or are trying to decide on if you need one or not, you’re in the right place. Below, I’ll cover all of the essentials of a scroll saw, including how it works, different types, and what they’re best for.
Let’s get started, shall we?
What Is A Scroll Saw?

A scroll saw is a mounted power saw that uses a small, fine blade.
They have a similar appearance to band saws and share a few other similarities as well. However, the way a scroll saw operates provides some unique characteristics and unlocks the ability to make cuts you wouldn’t be able to make with other saws.
The scroll saw’s setup involves a table, with the blade positioned towards the center. The blade comes up through the bottom of the table and connects to an arm that is reaching out and over the table. This arm moves the blade up and down.
Powering the saw on causes the blade to move up and down in rapid fashion, creating a brisk sawing motion. The blade itself is very small, typically with blades on one side.
When using a scroll saw, you can feed the workpiece into the blade, and make intricate freehand cuts in any direction — even cutting perfect right angles at will. The tiny profile of the blade allows for this and also creates smooth cuts that rarely need any sanding if any at all.
There is hardly any kickback with a scroll saw, and due to the motion and profile of the blade, it’s very safe as well. I don’t recommend doing this, but when using a spiral blade, you can actually tap the blade with your finger when it’s on, and it won’t harm you. This is one of the reasons a scroll saw is great for kids to start out on.
That’s pretty much it. A scroll saw is very simple in nature and does not require much expertise to use correctly. Angle adjustments can be made by beveling the table as needed, and you can also adjust the speed on most models, but that’s as complicated as it gets.
Another thing you may notice when using a scroll saw is how quiet it is. Many other power saws require ear protection when in use, but when using a scroll saw, you can usually carry on a conversation with someone nearby without the need to raise your voice very much.
History Of The Scroll Saw
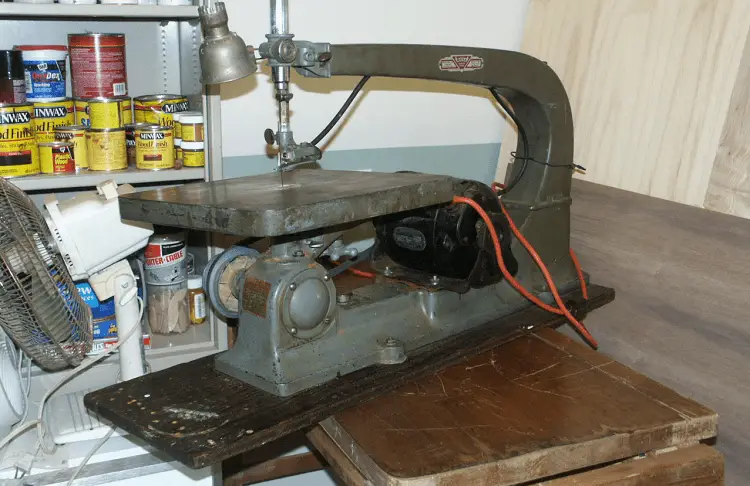
Like most power saws we know today, the origins of the scroll saw are a little ambiguous, but there are a few different phases that can be traced back and forwards into the scroll saws we know today.
The blade style used with scroll saws are thought to have originated in Europe during the 1500s. These blades were developed by clockmakers that needed a way to make intricate cuts for the cases holding the clocks.
Several years later, a famous craftsman living in Paris named Andre Charles Boulle used that blade style and implemented it with a U-shaped frame he designed himself. He used this saw to make inlays primarily but later used it for more intricate woodworking that typically required ordinary hand saws.
Boulle’s saw became quite popular after this, with the British company Hobbies Unlimited mass producing one of the earliest commercial versions, and dubbing it a “fretsaw.”
The late 1700s witnessed a lot more progress with this type of saw, which eventually reached up to 10 feet in height, and used a foot pedal to churn the machine and move the blade, similar to old sewing machines.
By the 1800s, the saws had become much smaller and easier for common people to own and store. Despite the reduction in size, the saws still operated in a similar manner. It wasn’t until the early 1900s when the modern scroll saw as we know it today began to take shape.
The Modern Scroll Saw
By the 1920s, the term “scroll saw” has become common, and around the 1970s, the scroll saw evolved closer to the versions we now see today. These scroll saws used what’s known as a “rigid arm,” with the over-arching arm being used only to stabilize the saw body.
This rigid arm style was gradually replaced by what’s known as a constant-tension arm, or C-arm, which connects to the blade from the top and bottom, moving the blade up and down on each end in unison. This optimizes blade tension and allows for enough flexibility to prevent the blade from breaking easily.
Today, most scroll saws use the C-arm constant tension system.
Scroll Saw Anatomy
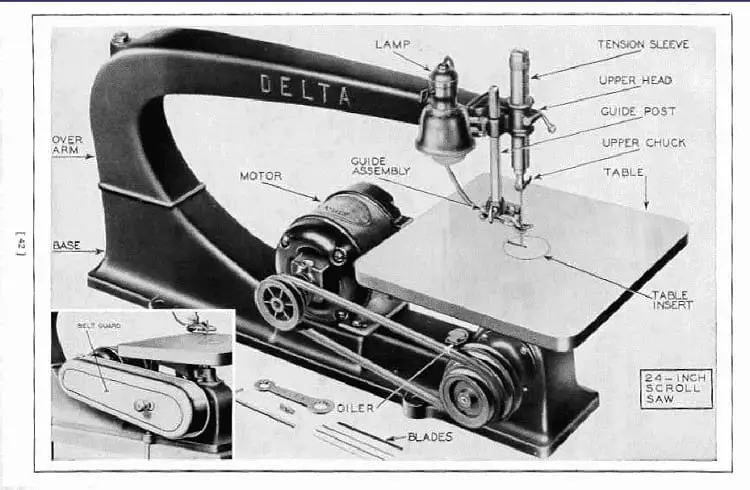
The best way to fully comprehend a scroll saw is to understand each part and what it does. While these parts may vary somewhat in function and design depending on the manufacturer, they are likely to be found on every scroll saw.
Table
The table of the scroll is where you rest the workpiece while performing cuts. It provides a stable, even surface to hold your workpiece, and can often be adjusted in terms of angling if needed.
Foot
This part hovers over the workpiece and works in conjunction with the table to keep the workpiece stable, while also preventing it from jumping off the table when the blade makes contact.
The foot can be adjusted up and down as needed and has space on each side so you can see the blade properly as it’s making the cuts.
Saw Arms
The arms of the scroll saw are what do all the work, moving up and down while attached to the blade to create the cutting motion. The main saw arm extends over the top of the table and to the center where the blade is located.
Blade
The blade is what does all the cutting (obviously), and is connected on both ends to the saw’s arms. While there is a lot of variance among blade styles, they all maintain the same thin profile, allowing for agile, clean, and even cutting.
Scroll saw blades are almost 5 inches in length, with a few exceptions.
Clamp
The clamp(s) are what attaches the blade to the arms, and holds it in place. These are located on each end of the saw arm where the blade meets the arms. These can be loosened to allow the removal of the blade.
When threading the blade through a workpiece, the top clamp can be loosened to free the top of the blade, which you can then place into the workpiece before reconnecting.
Tension Lever
The tension lever on a scroll saw is typically located at the top of the saw arm and is essentially used as a sort of quick release to loosen up the blade for any number of reasons.
Tension Knob
The tension knob(s) are what you use to adjust the tension of the blade before cutting. These are usually simply knobs that increase or decrease tension with a simple turn and tend to be located towards the back of the saw arm.
Power Switch
This one is pretty self-explanatory but still worth highlighting. Many scroll saws place the power button on top of the saw arm so you can easily reach it when sitting, allowing you to turn it on and off as needed when threading the blade, or adjusting tension, all without having to get up.
Foot Pedal
Many scroll saws come with a foot pedal you can use to power the blade on and off as needed. This gives you better control over the blade, which can come in handy when performing intricate cuts and entry points since you can quickly turn the blade on and off in between positioning the workpiece.
Speed Control
Speed plays a large part in how clean the blade can cut, but different workpieces and woods do work better at different speeds. The majority of scroll saws have speed control knobs that let you choose your RPM.
Types Of Scroll Saws
When it comes to scroll saws, there really aren’t any different types anymore, unless you count older relic scroll saws that probably belong in a museum somewhere instead of a workshop.
The main differences among scroll saws today would only be in regards to the power supply, such as either electric-powered scroll saws, or manual scroll saws powered via foot pedal, the latter of which is fairly rare now.
What Are Scroll Saws Used For?
Like every other saw, scroll saws can be used to cut wood in more than a few ways. With that said, here are some of the specific ways a scroll saw can be an advantage.
Curved Cuts
Most power saws struggle with cutting curves with a high level of accuracy. With general construction projects, this may not be that much of an issue, but when you’re taking on projects with more intricate aspects, perfect curves are a must.
The profile of a scroll saw’s blade makes it much easier to cut curves into workpieces. In most cases, if you can trace a line, you can cut a curve. This can come in handy with any number of projects.
Lettering
If you’re looking for the best method to cut letters out of wood and other compatible materials, it’s hard to think of anything else better than a scroll saw. Sharp right angles, curves, and cutouts are all easily done using scroll saws.
Dovetail Joints
A dovetail joint is one of the oldest joint methods in the world and has been used for everything from ancient churches, to Egyptian pyramids.
This joint is made by cutting two ends of materials with corresponding trapezoid ends, which then fit perfectly together and hold in place. When done correctly, a dovetail joint does not need any metal fasteners to hold it in place, only some wood glue or other adhesive.
These joints are small and intricate and require the utmost precision in order to work correctly. This gets even more complicated when the workpiece is small. A scroll saw is the ideal method for making dovetail joints in almost any case, and especially with smaller pieces.
Intarsia
Intarsia is an old-style form of art that uses wooden pieces cut into shapes in order to create depth and a more 3-D feel. Each piece is individually cut, and then placed on a surface, or joined with other pieces in order to complete the image.
As you can imagine, intarsia requires the highest amount of accuracy and attention to detail, and a scroll saw is the only way to accomplish this — aside from doing it the old-fashioned way and using a knife.
Freehand Sawing For Art

When not using scroll saws for ordinary projects and contracting, many woodworkers enjoy using them for art pieces. This typically involves cutting out highly detailed patterns and tracings out of larger pieces of wood.
Skilled woodworkers can freehand the cuts as they go, and end up with amazing pieces of art by the time they’re done. While this does take a lot of skill, woodworking amateurs may be surprised as to what they can come up with just a little planning.
And, as mentioned earlier, freehand cutting on a scroll saw is an excellent introduction for younger people to get acclimated to power saws and woodworking in general.
Scroll Saw Accessories
As with any saw, scroll saws are compatible with a wide range of accessories that can help improve their functioning and overall convenience.
Scroll Saw Tape
In many ways, scroll saw cuts can sometimes be very similar to tracing on a piece of paper.
Scroll saw tape is what you draw (or trace) your design onto, and then place it on the workpiece in order to guide your cutting. You simply follow the lines with the saw blade, almost as if you are drawing on top of it.
The tape comes in large sheets, often as big as a piece of standard paper, or larger. It’s actually fairly similar to masking tape, as you can use anything from a pencil to a marker to draw on the surface.
Anyone needing guidance on their cuts who also want to avoid drawing on the workpiece itself will need scroll saw tape.
Work Light
When using a power saw, and especially one that requires an added amount of precision, the more light, the better.
Work lights come in several different forms, and can really be as primitive as you’d like, whether you’ve taped a flashlight to a ladder and aimed it at your cut line, or used a smaller telescoping light that can be clamped to your saw’s table.
There are plenty of scroll saw work lights on sites like Amazon which can attach to the saw body itself, and then be aimed at the cut line to improve your cutting.
Blower Hose
Sawdust is a problem with any saw, and that includes the messes it causes and possibly getting it in your eyes and lungs. With scroll saws, dust can be even more problematic, since it can cloud the cut line and obstruct your vision as you cut, mainly due to obscuring where the blade is making contact with the piece.
Some scroll saws come with their own blower hose that uses a bellow, which is pumped in and out as the arm moves up and down with the saw. This is connected to a tube that is aimed right at the cut line and consistently blows the sawdust away as long as the saw is on.
Not every scroll saw has this though, which leaves you with the option of purchasing your own. For some, a simple shop vac will suffice, but others may want to buy a kit that sucks the sawdust down and into a bin under the table.
Blade Holder
Most scroll saw users will want to keep a number of blades on hand, whether it’s to ensure they always have a sharp blade or need different styles of blades for different cuts and materials.
An easy way to keep your blades nearby and avoid losing them is to get a blade holder that holds the blades, and can attach to the body of your saw with a magnet. That way you’ll never have to dig through your shop drawers for a blade, as it’s always within reach on the saw itself.
Cover
Dust is an ongoing enemy to all of your tools, which certainly includes a scroll saw. When not using your saw, it’s always best to keep it covered in order to protect it from dust in the shop, and any possible water leaks as well.
Many saws come with a cover, but if yours doesn’t, I advise you get one. They’re inexpensive and easy to find.
Pedal
I’ve already touched on pedals, but they’re worth going over again. You can hook up an external power pedal to most power saws, but a scroll saw can benefit the most, giving you full control of the blade operations you move the workpiece around.
Hopefully, your scroll saw comes with a power pedal, but if not, you should definitely buy one. They are easy to install, requiring just an extra extension cord.
Table-Mounted Magnifying Glass
The level of detail sometimes involved with a scroll saw can be a little hard if you have trouble with your vision. Others may simply want a more close up view than they can get with their naked eye.
Table mounted magnifying glasses are an ideal solution. Most of these magnifying glasses are as big as a standard sheet of paper and can be mounted on the table of the saw.
You can then move the magnifying glass in between you and the cut line, gaining a much better view, without having to get your head closer to the cut area, or using glasses.
More often than not, these magnifying glasses also come with a light that will point in the direction of the cut line, so you can basically get two products in one.
Sander
Scroll saws can be used for more than just cutting. Sander “blades” can be swapped out in place of standard blades, turning the scroll saw into a power sander. This is as easy as changing a blade.
The size of the sander piece is often great to use with smaller workpieces than need finer sanding and more attention to detail.
Stand
Many power saws with tables do not come with their own stands, and this is even more true with scroll saws due to their smaller size.
An external stand lets you set the scroll saw up anywhere you’d like, rather than having to affix it to a random surface in your shop, or on a sawhorse.
Scroll Saw Blades
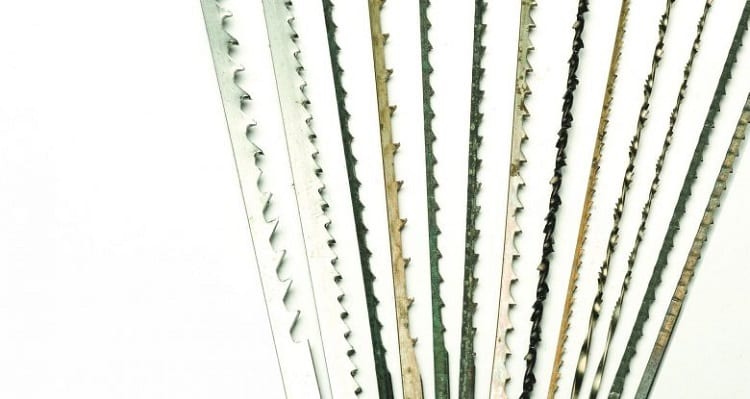
Scroll saws can be used with many different styles of blades, each with their own advantages. Here are the most common ones.
Regular
The most basic scroll saw blade is simply referred to as a regular blade. This blade has the teeth evenly spaced out at a downward angle, and where one tooth ends, another one starts.
These blades are the most common, and will likely come with a newly purchased scroll saw. They are effective, but some users may eventually want to swap them out for something different.
Skip Tooth
As the name suggests, a skip tooth blade skips the area where one blade would begin on a regular blade, leaving a blank space instead.
While less saw teeth may sound counterproductive, it actually lets the blade cut faster, and reduces the amount of sawdust as well, helping improve accuracy.
Double Tooth
A double tooth is yet another variation on the regular blade. This version groups to regular scroll saw blade teeth together in succession, followed by a gap of the equivalent of two teeth.
This cuts down on the sawdust level, even more, produces a smoother cut, and provides a little more added control.
Reverse Tooth
A reverse tooth blade groups teeth together, usually in groups of three. There is then a space in between the next group, which is the same size and angle of the other group, but with the teeth pointed in an inverted position.
This unique configuration helps to cut workpieces with less splintering and ensures more accuracy. This tooth setup does cause more heat and friction, however, which can reduce blade life and even scorch the workpiece. Reverse tooth blades are better on softer woods, and also plywood.
Two-Way Cut
Two-way scroll saw blades have a similar setup to a reverse tooth blade, except instead of groups of three, the blades are grouped in pairs, and with less space in between each.
Two-way blades work like reverse blades, but offer a smoother cut and less friction.
Crown-Tooth
Crown-tooth blades use the smallest teeth out of all the standard blades. The teeth are grouped in pairs, and point in opposite directions. There is an even space in between each pairing that’s equivalent to the size of a pair.
Crown-tooth blades have the slowest cutting out of all the blades, but they also produce the smoothest cuts and are great for working with smaller pieces that have a lot more detail.
Spiral
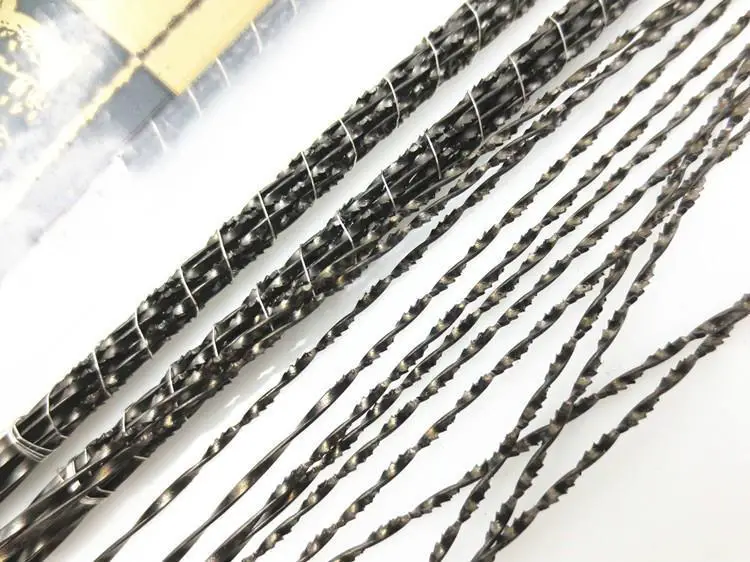
A spiral blade is essentially a regular blade with shorter teeth, that has then been twisted into a spiral. This allows the blade to cut in every direction at once, almost like a drill in some ways.
The kerf size on a spiral blade will be bigger than flat blades due to the spinning profile. Some spiral blades are also available in reverse-tooth, and skip-tooth configurations.
These blades allow for instant direction changing on a workpiece during the cutting, so they are great for making the most detailed cuts, and are especially useful for curves, and making in cuts on smaller pieces.
Always make sure you have at least a spiral blade in addition to your regular blade. This gives your scroll saw a lot more versatility.
Specialty Blades
Cutting materials other than standard wood typically requires blades that are specially designed for that specific material.
You can find scroll saw blades that are made for cutting metal and plastics, and even diamond-tipped blades that can make smooth cuts on even the hardest woods.
How To Use A Scroll Saw
Here is a quick walkthrough on how to cut a workpiece that has detailed cuts needed inside of the pattern’s border.
1. Turn the saw on, and trim any excessive material around the outline of your pattern.
A blade with fewer teeth may be better for this if you’ve got one.
2. Adjust the speed, and then begin cutting out any patterns from the inside. If you need to do an inline cut, drill a hole in the center of the part you’re cutting out, unclamp the top of the blade, thread it through the hole, re-clamp it, and then continue sawing, repeating the process as often as necessary.
3. For the outside cuts, Begin by cutting lines into the border from the outside, so that the pieces come off neatly as you cut.
4. Use both hands to hold the workpiece, and then carefully guide it along with the guidelines for the pattern. Make sure to listen to the blade for any screeching or difficulty cutting, and then adjust speed as needed.
5. Continue cutting until the piece has been finished.
6. If needed, swap out the blade for a sander and sand any part of the piece that needs to be smoother.
7. Wipe off any excess dust, unplug the saw, and you’re all done.
How To Change A Scroll Saw Blade
1. Make sure the saw is unplugged from your power supply.
2. Loosen the tension lever.
3. Loosen the screws or knobs providing the tension to the blade. There will usually be one on the top and bottom of the blade. Be sure to keep the knobs or screws on, if possible — you only need to loosen them enough to let go of the blade.
4. Remove the blade.
5. Examine the replacement blade for any bends, cracks, rust, etc. Never use a damaged blade.
6. Insert the new blade. This is almost always be done in the reverse fashion in which you removed the other blade. For instance, if you pulled the blade up from the top, you’ll insert the new blade back down instead.
7. Align the holes on each end of the blade with the screws or knobs.
8. Tighten the screws, and make sure the blade is straight.
9. Flip the tension lever back to its original position.
10. Continue to tighten the screws or knobs until the blade has the proper tension. Do not over-tension the blade. (A good way to “listen” for the tension is to flick the blade. It should sound similar to a harp string.)11. Turn on the saw, and test out the blade on a small piece of scrap material. Make any adjustments if needed.
Crucial Scroll Saw Safety Tips
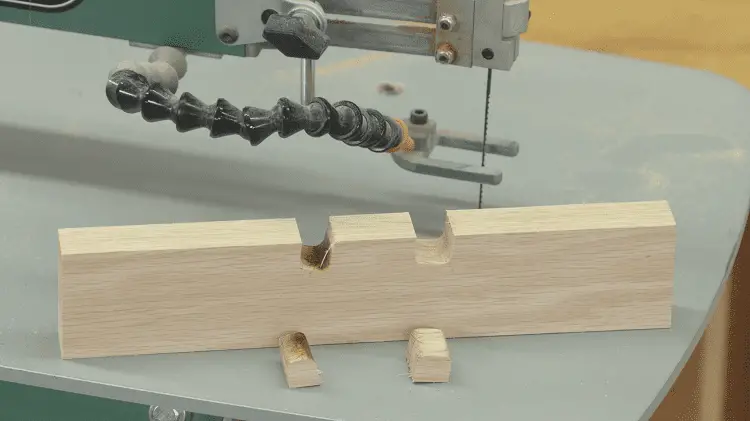
When operating any saw, it’s always infinitely important that you follow safety protocols, ensuring that you don’t have an accident, injuring yourself or someone else.
A little common sense goes a long way of course, but there are still a number of measures you can take to increase the safety factor.
● Wear safety glasses. – Everyone should know this by now, but it’s always worth repeating. Any time you’re operating a power saw, you should be wearing goggles. You never know when a piece of sawdust could fly into your eye, and there’s always the chance of your workpiece flying off the table if it catches the blade when not properly secured. Just don’t risk it.
● Wear a dust mask. – If you think a pair of goggles is all you need, you’re wrong. Saw dust may seem like not that big of deal, but it can be very harmful to your body over time if you’re constantly inhaling the dust as you work. Wear a mask to prevent saw dust from getting in your nose and mouth.
● Ensure stability. – A saw operated on a shaky or uneven surface is an accident waiting to happen. Before even turning the saw on, always make sure your saw is on firm, even ground, and that there’s no chance of it moving when in operation. This includes checking the stand itself as well.
● Never lift the saw by the arm. – You’ll probably need to move the saw at some point, so when you do, make sure you’re not lifting or grabbing it by the top saw arm. This can damage the saw by bending the arm itself, or the joints. Instead, pick up the saw by its base or legs — never the arm.
● Always use proper lighting. – The better you can see, the better you’ll cut, and the less likely you’ll be to cut the wrong thing. Never try to wing it in a dimly lit shop. If the overhead lighting in your shop is not sufficient, acquire an external light to use with the saw.
● Check your blades. – Dull, bent blades are not only detrimental to the quality of your cut, they can be dangerous too. Before cutting, always examine your blades for any defects, bends, cracks, or anything else that could be wrong.
● Don’t cut wet wood. – Dry your wood before cutting. The smallest amount of moisture can cause your blades to wear out faster, or even result in slippage.
● Use a pencil with eraser when cutting close to the blade. – When using a scroll saw, there will undoubtedly be times when you may have to get your hands a little closer to the blade than you’d like. Using a pencil’s eraser to push the workpiece instead of your hand is just as effective, and much safer.
● Unplug when not in use. – After you’re done using the scroll saw, or really any power saw, always unplug it. This prevents accidents, and also protects the saw just in case any moisture finds its way into the space.
Follow these 9 tips and enjoy woodworking!
Scroll Saw Maintenance And Cleaning
Giving your scroll saw the proper amount of maintenance will go a long way in ensuring that it works perfectly for years to come. Here are some tips and suggestions to help you keep your saw in the best shape possible.
Cleaning
This part is fairly simple. Cleaning your scroll saw should not require much more than a rag, and perhaps either a can of air or the air compressor in your shop.
After you’re done cutting for the day, take a dry rag and run it over the table to get rid of any sawdust. Do the same for any immediate surrounding areas, and then wipe the blade off. Check around any joints to see if there is sawdust buildup.
If there is, use a can of air (or air compressor)to blast the dust off the joints, and any other area where it’s been collecting.
Oh, and be sure to flip the tension lever off, which will give the blade just a little it of slack. Leaving a scroll saw blade fully tensioned will eventually cause it to warp, or even crack.
Maintenance
Scroll saws typically do not require a lot of excessive maintenance in order to stay running on a high level.
The only real steps you can take with maintenance is to routinely check the tension knobs and levers to make sure they aren’t stripped, and follow that by checking the connections, cord, plug, and the foot pedal if you have one.
After a year or so of use, it may also be helpful to add a small amount of lubricant to any joints on the saw.
As for the table, keeping it cleaned and waxed will ensure better cutting thanks to a smooth surface. You can use furniture-grade paste was once or twice a year on the table to keep it in prime condition.
Conclusion
As you can see, scroll saws have a surprising amount of uses, both inside the home improvement/contracting realm, and outside of it.
They are unbeatable when it comes to making the most intricate of cuts, and are just as suited for artwork and fine woodworking as they are for getting jobs done around the house.
Better yet, they can also be surprisingly inexpensive, making it easier to add one to your tool collection.
Are you in the market for a new scroll saw, or just curious what to look for in one?
Be sure to check out our buying guide for in-depth information and my personal picks for the best scroll saws on the market.
